So my shop's been open a week and in that time I've made one online sale and six offline sales from people who'd seen the items on it, two of which were custom items (and one 'almost' sale to the US but the buyer disapeared and didn't complete payment!). So I'm happy with the start I've had! I'm still working hard to catch up with listing items, taking photos, updating facebook and twitter, trying out other online venues to sell and eventually I'll maybe get the time to make some more items. My first online sale was to a fellow folksy shop owner pussy galore who makes beautiful sock cats, check her out!
In the meantime I've discovered Spoonflower, a service that lets you get designs made into fabric, it's US based but looks great, hopefully in the future I'll be able to use it for a project. The way it works you upload your designs and then they'll print them for you but you can also sell your new fabrics to the public through the site, there is some really nice stuff on there, a wee showcase of some of my favourites is below:
This includes fabrics available from: craftylittlemia , renule , maile , petunias , bronhoffer , royal forest , cabinpressstudio , troismiettes and hlozik
Wednesday, 17 February 2010
Wednesday, 10 February 2010
Online shop is open!
I've only uploaded some items and will update it over the next few days but my Folksy shop is open. I've started out with some jewellery and accesories and will expand as I get stuff photographed and made.
Check it out and leave me a comment to let me know what you think! Online shop
Monday, 1 February 2010
Alphabetti Spagetti
I dont know if it's a side effect of my graphic design work but I really love typography based design.
These typography drawers are my absolute favourite, they're from Kent & London and are handmade. A little out of my budget though!
Typographic soap from Soapy Love, scented with crushed peppermint the soap was molded from a unique silicone mold.
A - Z shelves, used to be made by Pottery Barn but have been delisted...they're crying out to be home-made though, hmm - if I ever have time!
These typography drawers are my absolute favourite, they're from Kent & London and are handmade. A little out of my budget though!
Typographic soap from Soapy Love, scented with crushed peppermint the soap was molded from a unique silicone mold.
A - Z shelves, used to be made by Pottery Barn but have been delisted...they're crying out to be home-made though, hmm - if I ever have time!
Thursday, 28 January 2010
Resin and painting pendant
I had the idea to make a necklace for a Christmas present for a friend of mine. She is an illustrator and paints horse and dog portraits (you can see her work on her website here) so I thought it would be nice to embed one of her works in a pendant. After finding an image I thought would go well I had to print and seal it before embedding it inside a pewter pendant bezel and once it had fully cured I hung it on a purpley-aubergine ribbon necklace.
The first picture shows the whole necklace (with a small pink star on the extension chain) And the second is a close up of the pendant itself. I hope she liked it!

The first picture shows the whole necklace (with a small pink star on the extension chain) And the second is a close up of the pendant itself. I hope she liked it!

Wednesday, 27 January 2010
Progress and award
It's been a really busy week so I've not been able to update my facebook page yet this week and I'm late posting this (well late by my self-imposed aim to blog at least once weekly!)
But I'm happy as even without it my facebook page fanbase is steadily creeping up, I'm at 89 fans now and I'd planned to do announce a giveaway when I was close to 100 so keep your eyes peeled!
I had another good surprise, last week Minky Magic (maker of lovely vintage inspired accessories) awarded me with my first blog award, the Sunshine Award is awarded to bloggers whose positivity & creativity inspires others in the blog world. I was delighted to recieve this so early into my blogging experience.

The rules for accepting this award are:
Put the logo on your blog or within your post,
Pass the award onto 12 bloggers,
Link the nominees within your post,
Let the nominees know they have received this award by commenting on their blog,
Link to the person from whom you received this award.
So after catching up with the blogs I follow I have decided to pass the award on to:
Created and Felted,Niche Handmade,Mini Felts,Not Just Handbags, Giddy Stuff, Team Awesome, Monkey & Squirrel, Itty Bitty Ninja Kitty, Haptree and Me, Experimentalk, Carl Martin Jewellery, Aviya Glass
Enjoy!
But I'm happy as even without it my facebook page fanbase is steadily creeping up, I'm at 89 fans now and I'd planned to do announce a giveaway when I was close to 100 so keep your eyes peeled!
I had another good surprise, last week Minky Magic (maker of lovely vintage inspired accessories) awarded me with my first blog award, the Sunshine Award is awarded to bloggers whose positivity & creativity inspires others in the blog world. I was delighted to recieve this so early into my blogging experience.

The rules for accepting this award are:
Put the logo on your blog or within your post,
Pass the award onto 12 bloggers,
Link the nominees within your post,
Let the nominees know they have received this award by commenting on their blog,
Link to the person from whom you received this award.
So after catching up with the blogs I follow I have decided to pass the award on to:
Created and Felted,Niche Handmade,Mini Felts,Not Just Handbags, Giddy Stuff, Team Awesome, Monkey & Squirrel, Itty Bitty Ninja Kitty, Haptree and Me, Experimentalk, Carl Martin Jewellery, Aviya Glass
Enjoy!
Monday, 18 January 2010
Stuck with photography so here's some t-shirts!
Trying to sort out the photos to be able to list items for sale online is giving me a headache so I thought I'd distract myself (and post something contructive!) by putting up some of my commisioned t-shirt designs. These ones were done for a local martial arts school, a couple of one offs and the main club t-shirt. All were done with heat applied vinyl.


Unlike screen printing, which has high set-up costs, using vinyl means it's possible to do one-off designs and small runs which would just work out too expensive otherwise. Also you can get nice effects like metallics, glow in the darks, glitter, patterned, sparkles etc. The standard club t-shirt (left) is metallic gold on black.
One drawback to using vinyl is it's harder to do multicoloured designs as you can't do shades only blocks of colour. If you look at the Matador t-shirt (the first picture) you can see it's made up of three shades of red and a tan colour. (NB. This image actually shows a black as well but as the final design was applied on a black t-shirt the t-shirt itself was used for the background colour. This image is a mock-up).


Unlike screen printing, which has high set-up costs, using vinyl means it's possible to do one-off designs and small runs which would just work out too expensive otherwise. Also you can get nice effects like metallics, glow in the darks, glitter, patterned, sparkles etc. The standard club t-shirt (left) is metallic gold on black.
One drawback to using vinyl is it's harder to do multicoloured designs as you can't do shades only blocks of colour. If you look at the Matador t-shirt (the first picture) you can see it's made up of three shades of red and a tan colour. (NB. This image actually shows a black as well but as the final design was applied on a black t-shirt the t-shirt itself was used for the background colour. This image is a mock-up).
Sunday, 10 January 2010
6 inspiring paper artists
How people interact with physical designs is a big area of interest to me, when studying product design it was relatively easy to see how to consider this with actual physical products, but in my graphic design work it's a harder matter as you are mainly dealing with simple 2D materials (posters, flyers etc). Because of this I became interested in pop-ups, and through researching these realised that the world of making 3d forms from paper was a lot wider and exciting than i first thought.
Pop-ups, origami, kirigami, paper architecture, paper illustration, Mon-kiri, scherenschnitte, paper art...there is no one term that can cover the variety of facets in this field. Below I've compiled a very short list of some of the most inspiring artists/craftmens in this field. Hope you like it!
Eric Joisel
Amazing paper sculptures that almost look like they've been carved from stone. The root of Joinsel's work lies in origami, and the "Creating Process" section on his website shows how complex the folding pattern are. Amazingly most of his figures are created from single sheets of paper.


Jen Stark
Instead of folding, Jen Stark's paper art uses a technique of cutting through stacks of coloured paper to produce sculptures reminiscent of wormholes and fractal patterns.


Peter Callesen
A combination of paper folding and cutting (origami and kirigami) give Peter Callesen's works a feeing of delicate fragility. He uses the basic white A4 sheet to produce the majority of his creations.


Rob Ryan
Rob Ryan's impossibly intricate paper cuts contrast romantic images with the darker sentiment of the words carved within them.


Ingrid Siliakus
Taking inspiration from the founder of this particular type of paper art Masahiro Chatani, Ingrid Siliakus uses the complex art of cutting and folding to create precise architectural forms. Unlike origami where several sheets of paper can be used in paper architecture the intricate models are made from just one sheet of paper so cuts have to be carefully calculated.


Yulia Brodskaya
A graphic designer, Yulia has developed a unique style using cut and curled paper to make colourful, flowing typographic illustrations.


Pop-ups, origami, kirigami, paper architecture, paper illustration, Mon-kiri, scherenschnitte, paper art...there is no one term that can cover the variety of facets in this field. Below I've compiled a very short list of some of the most inspiring artists/craftmens in this field. Hope you like it!
Eric Joisel
Amazing paper sculptures that almost look like they've been carved from stone. The root of Joinsel's work lies in origami, and the "Creating Process" section on his website shows how complex the folding pattern are. Amazingly most of his figures are created from single sheets of paper.


Jen Stark
Instead of folding, Jen Stark's paper art uses a technique of cutting through stacks of coloured paper to produce sculptures reminiscent of wormholes and fractal patterns.


Peter Callesen
A combination of paper folding and cutting (origami and kirigami) give Peter Callesen's works a feeing of delicate fragility. He uses the basic white A4 sheet to produce the majority of his creations.


Rob Ryan
Rob Ryan's impossibly intricate paper cuts contrast romantic images with the darker sentiment of the words carved within them.


Ingrid Siliakus
Taking inspiration from the founder of this particular type of paper art Masahiro Chatani, Ingrid Siliakus uses the complex art of cutting and folding to create precise architectural forms. Unlike origami where several sheets of paper can be used in paper architecture the intricate models are made from just one sheet of paper so cuts have to be carefully calculated.

Yulia Brodskaya
A graphic designer, Yulia has developed a unique style using cut and curled paper to make colourful, flowing typographic illustrations.

Saturday, 2 January 2010
Setting up to sell online to do lists!
Trying to get ready to get items listed up online for sale but there so much to do and it can be a bit like the chicken and the egg....what to do first, what's better done when there's actually listings up.
I'm concentrating on setting up on Etsy first, even though it's a US based site (and so all transactions are in dollars) it seems to be the busiest handmade marketplace and where most people seem to get most success. So my logic is - is everything's set up on there then it should be easy to transfer to other marketplace sites. So currenty my to do list includes:
- research and write shop policies (shipping, returns etc)
- write descriptions for around 5 items to start me off
- photoshop the rest of the item photos ready for listing
- design and make packaging and basic business cards to send out with orders
- make a spreadsheet that lets me work out selling prices and also allows me to track etsy, paypal and postage fees
- sort out a paypal account
and that's before I start on getting t-shirt designs and other items made. My main problem at the minute is getting bogged down in researching things (like shipping policies etc), I need to stop reading and start writing! Plus I'm still trying to get some belated Christmas presents for friends made up too.
Here's a pair of transformers cufflinks I made for a friends birthday, I'm quite happy with the way they turned out, and some of my lastest batch of resin bits and bobs waiting to get polished up...


I'm concentrating on setting up on Etsy first, even though it's a US based site (and so all transactions are in dollars) it seems to be the busiest handmade marketplace and where most people seem to get most success. So my logic is - is everything's set up on there then it should be easy to transfer to other marketplace sites. So currenty my to do list includes:
- research and write shop policies (shipping, returns etc)
- write descriptions for around 5 items to start me off
- photoshop the rest of the item photos ready for listing
- design and make packaging and basic business cards to send out with orders
- make a spreadsheet that lets me work out selling prices and also allows me to track etsy, paypal and postage fees
- sort out a paypal account
and that's before I start on getting t-shirt designs and other items made. My main problem at the minute is getting bogged down in researching things (like shipping policies etc), I need to stop reading and start writing! Plus I'm still trying to get some belated Christmas presents for friends made up too.
Here's a pair of transformers cufflinks I made for a friends birthday, I'm quite happy with the way they turned out, and some of my lastest batch of resin bits and bobs waiting to get polished up...


Wednesday, 30 December 2009
so adventures in blogging begin...
I design and make custom t-shirts, hoodies, jewellery and crafty things and am hoping to soon have some of my stuff up for sale on a couple of handmade marketplaces including Etsy and Folksy. I was hoping to have this done for the New Year but so much to do and so little time!
I thought I'd start off with listing some jewellery and add in my t-shirt designs and other assorted things as I get them finished. From other websites and shop listings I've seen I personally think photography makes or breaks a shop so I was hoping to get some half decent shots done of a couple of items to start me off...not realising it's really not as simple as it sounds!
Spent most of my day messing about with a rough-and-ready lightbox set up (based on this tutorial) but I really don't have the lighting required (or maybe just the skill!) so ended up spending most of the time adjusting my images in photoshop.
I think I'm going to buy a couple of desk lights and experiment with some backgrounds. And maybe with a bit of practice I get clear shots without having to spend time editing out the shadows of my hand, camera, head etc etc!
Anyway....some initial shots.
.jpg)
.jpg)
.jpg)
I thought I'd start off with listing some jewellery and add in my t-shirt designs and other assorted things as I get them finished. From other websites and shop listings I've seen I personally think photography makes or breaks a shop so I was hoping to get some half decent shots done of a couple of items to start me off...not realising it's really not as simple as it sounds!
Spent most of my day messing about with a rough-and-ready lightbox set up (based on this tutorial) but I really don't have the lighting required (or maybe just the skill!) so ended up spending most of the time adjusting my images in photoshop.
I think I'm going to buy a couple of desk lights and experiment with some backgrounds. And maybe with a bit of practice I get clear shots without having to spend time editing out the shadows of my hand, camera, head etc etc!
Anyway....some initial shots.
.jpg)
.jpg)
.jpg)
Wednesday, 11 November 2009
Creative facebook profile pictures
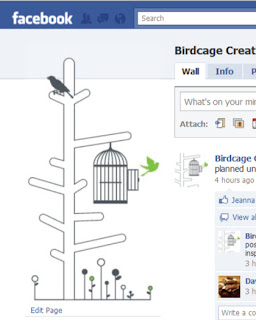
You might have noticed that facebook overlaps your profile picture slightly with the light blue banner on your profile page, you can use this to get a bit creative with your picture like those below:
To do this you're essentially just playing around with the space that facebook allocates for your profile picture. You need to have some basic knowledge of image editing and access to appropriate software (something along the lines of photoshop, illustrator, corel draw etc). This should work for both personal profiles and pages/groups.
Facebook allows your profile picture to maximum of 200 x 600 pixels, any picture larger than this will be scaled to 200 pixels in width. Firstly this means you can have a picture that's longer than the classic square photo as anything up to 200 pixels wide by 600 long will be displayed without any scaling.
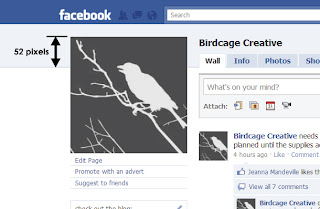
The second thing you can use to your advantage is the fact that facebook usually places your picture 52 pixels above the gray dividing line in the light blue area of the page (shown below with my old, unmodified picture)
You can see this placement actually looks a bit awkward, but with a few tweaks you can make a much nicer effect like those at the top, I'll outline the steps you need to do this.
I said above that the grey line normally appears 52 pixels below the top of the picture, the only thing now that will messes with this placement is if you put up a status update that is longer than one line. This will nudge your picture down as the light blue bar expands to accomodate your update. the way around this is to update your status as normal and then click on the "clear" link which appears next to your profile/page name on the blue bar. This just clears the status from here but it will still appear on your wall and in your friends/fans news feeds.
Hope this helps you alter your profile picture - any questions and example of pictures you create using this tutorial are welcome!
Click here or on the picture below to download the "blank" profile picture background
![]() |
| photo from allfacebook.com |
Facebook allows your profile picture to maximum of 200 x 600 pixels, any picture larger than this will be scaled to 200 pixels in width. Firstly this means you can have a picture that's longer than the classic square photo as anything up to 200 pixels wide by 600 long will be displayed without any scaling.
The second thing you can use to your advantage is the fact that facebook usually places your picture 52 pixels above the gray dividing line in the light blue area of the page (shown below with my old, unmodified picture)
![]() |
| my old page profile picture |
You can see this placement actually looks a bit awkward, but with a few tweaks you can make a much nicer effect like those at the top, I'll outline the steps you need to do this.
- Firstly you have to set up a blan document in your image editing program at 200x600 pixels (or whatever length you want your picture to be) and create a "blank" facebook background, like that shown at the bottom of this post, using the same colours as on the standard profile page.
- The gray line appears 52 pixels from the top of the picture, the gray facebook uses is #D8DFEZ in hex (or in rgb it's 216/223/234) and the line has a stroke of approximately 1 pixel. Above that the light blue box is #EDEFF4 (237/239/244 in rgb). For anyone struggling with this I've included a link to a jpeg I made with a ready-made blank background, just add your own picture to it. To download the jpeg just click on the blank background image at the bottom of this post.
- Once you have this set up you can paste your image on top, the key here for the effects shown at the top is to have an over lapbetween your image and the base background. To achive this you can mask out part of your picture (like in the peeking out picture below) or simply use a vector image with a transparent background (like I have in my new profile picture). There are several different ways to mask out a background in an image, you can find a quick tutorial on how to do it using the quick mask tool in photoshop here.
![]() |
| photo from walyou.com |
- Now all you have to do is upload your new picture on to your profile (if you hover to the top right of your existing picture on facebook a link to 2change picture" should appear, select "upload" and away you go).
- One thing to check after you've uploaded your new picture is that the thumbnail appears as you want it. Again if you hover to the top right of your picture you can select "change picture" then "edit thumbnail". drag the thumbnail box around till you're happy with the picture and save.
![]() |
| my new profile picture |
I said above that the grey line normally appears 52 pixels below the top of the picture, the only thing now that will messes with this placement is if you put up a status update that is longer than one line. This will nudge your picture down as the light blue bar expands to accomodate your update. the way around this is to update your status as normal and then click on the "clear" link which appears next to your profile/page name on the blue bar. This just clears the status from here but it will still appear on your wall and in your friends/fans news feeds.
Hope this helps you alter your profile picture - any questions and example of pictures you create using this tutorial are welcome!
Click here or on the picture below to download the "blank" profile picture background
![]() |
| "blank" profile picture background |
Subscribe to:
Posts (Atom)