You might have noticed that facebook overlaps your profile picture slightly with the light blue banner on your profile page, you can use this to get a bit creative with your picture like those below:
To do this you're essentially just playing around with the space that facebook allocates for your profile picture. You need to have some basic knowledge of image editing and access to appropriate software (something along the lines of photoshop, illustrator, corel draw etc). This should work for both personal profiles and pages/groups.
Facebook allows your profile picture to maximum of 200 x 600 pixels, any picture larger than this will be scaled to 200 pixels in width. Firstly this means you can have a picture that's longer than the classic square photo as anything up to 200 pixels wide by 600 long will be displayed without any scaling.
The second thing you can use to your advantage is the fact that facebook usually places your picture 52 pixels above the gray dividing line in the light blue area of the page (shown below with my old, unmodified picture)
 |
| my old page profile picture |
You can see this placement actually looks a bit awkward, but with a few tweaks you can make a much nicer effect like those at the top, I'll outline the steps you need to do this.
- Firstly you have to set up a blan document in your image editing program at 200x600 pixels (or whatever length you want your picture to be) and create a "blank" facebook background, like that shown at the bottom of this post, using the same colours as on the standard profile page.
- The gray line appears 52 pixels from the top of the picture, the gray facebook uses is #D8DFEZ in hex (or in rgb it's 216/223/234) and the line has a stroke of approximately 1 pixel. Above that the light blue box is #EDEFF4 (237/239/244 in rgb). For anyone struggling with this I've included a link to a jpeg I made with a ready-made blank background, just add your own picture to it. To download the jpeg just click on the blank background image at the bottom of this post.
- Once you have this set up you can paste your image on top, the key here for the effects shown at the top is to have an over lapbetween your image and the base background. To achive this you can mask out part of your picture (like in the peeking out picture below) or simply use a vector image with a transparent background (like I have in my new profile picture). There are several different ways to mask out a background in an image, you can find a quick tutorial on how to do it using the quick mask tool in photoshop here.
- Now all you have to do is upload your new picture on to your profile (if you hover to the top right of your existing picture on facebook a link to 2change picture" should appear, select "upload" and away you go).
- One thing to check after you've uploaded your new picture is that the thumbnail appears as you want it. Again if you hover to the top right of your picture you can select "change picture" then "edit thumbnail". drag the thumbnail box around till you're happy with the picture and save.
I wanted my picture to closer reflect my business card and branding in my
online shops so you can see my new one below:
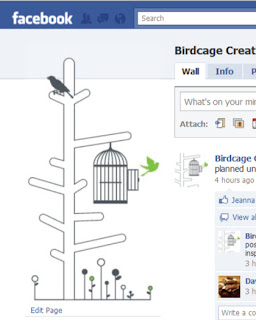 |
| my new profile picture |
I said above that the grey line normally appears 52 pixels below the top of the picture, the only thing now that will messes with this placement is if you put up a status update that is longer than one line. This will nudge your picture down as the light blue bar expands to accomodate your update. the way around this is to update your status as normal and then click on the "clear" link which appears next to your profile/page name on the blue bar. This just clears the status from here but it will still appear on your wall and in your friends/fans news feeds.
Hope this helps you alter your profile picture - any questions and example of pictures you create using this tutorial are welcome!
Click
here or on the picture below to download the "blank" profile picture background
 |
| "blank" profile picture background |


.jpg)
.jpg)
.jpg)
.jpg)

