


Seeing as I haven't managed to update this much through the year I thought I'd do some posts looking back at a few of the personalised items and commissions from over the course of 2012. For part 1 some hooded tops and t-shirts made for company and club uniforms.
Wednesday 26 December 2012
A look back at some of the year's commisions - part 1
Friday 15 June 2012
...and I'm back!
So a very long time and no posts! The past few months I've been kept busy as I've taken on an HND in Sports Therapy and also doing a lot of training (at my martial arts club and kettlebell sport training). Birdcage Creative has still been around but I just haven't had much time to keep things up to date here, but term is over now so all systems go!
Although it's not the most business related news I wanted to take the opportunity to put up a wee update, and ask for your support in the process (skip to the end of the post for that one!)
June has been a hectic month so far for me, I promoted to black belt in Kuk Sool Won the first weekend of the month, which involved doing my last 3 hour testing with the Grandmaster's son and other high ranking black belts, receiving my promotion from the Grandmaster himself and taking part in a black belt demonstration afterwards - a long, but exciting, weekend!
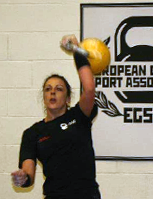 Also this month the club I train at is hosting a two day training seminar ran by the top two kettlebell athletes in UK and Ireland, I can't wait! I've been doing more kettlebell sports training recently (see here for a bit more of an explanation) in preparation for upcoming competitions, first one is in a few weeks up in Aberdeen then in August the team is traveling to Kilkenny in Ireland for the Irish Kettlebell Sports Championships. The picture to the left was at the English Open Long Cycle Competition back in February.
 To round off the month's events I'm taking part in a sponsored farmer's walk to raise finds for the gym I train at. A farmer's walk is an old strongman exercise for grip, back and leg strength that involves carrying weights in the hands over a distance. Sounds simple...but in this case we've set ourselves the ambitious target of carrying kettlebells for two miles. Considering my grip usually goes over the distance of 10 meters in the gym this is going to be brutal!
If anyone would like to support me and sponsor this torture you can do it using the "Donate" button below. Thank you! And I promise the next post will be back to the usual Birdcage Creative!
Although it's not the most business related news I wanted to take the opportunity to put up a wee update, and ask for your support in the process (skip to the end of the post for that one!)
June has been a hectic month so far for me, I promoted to black belt in Kuk Sool Won the first weekend of the month, which involved doing my last 3 hour testing with the Grandmaster's son and other high ranking black belts, receiving my promotion from the Grandmaster himself and taking part in a black belt demonstration afterwards - a long, but exciting, weekend!

If anyone would like to support me and sponsor this torture you can do it using the "Donate" button below. Thank you! And I promise the next post will be back to the usual Birdcage Creative!
Monday 12 December 2011
Adult T-shirt Colours
See the picture below for the colours I can offer adult t-shirts in (click
to see a larger version). I can apply your design in a choice of
colour(s) too, including plain, metallic and glittery.
I take orders for one-offs (without any set-up fees) or for larger quantities, each can be a different colour/design colour too. Perfect for sports teams, company promotion, staff uniforms or even just casual wear.
Other types of items are available including hooded tops (see here for colours: hooded top colours) and childrens t-shirts.
For more information just get in touch: contact@birdcagecreative.co.uk

Thursday 20 October 2011
Week 8 - Custom birthday card
Just a short one this week, thought I'd show a few pictures of a card I made recently for the birthday of one of the children in my martial arts school. I thought I'd have a go at making a spinning card i.e. I wanted the figure to spin when taken out the envelope.
To do this the cutout black silhouette is in two identical layers, between which is sandwiched a thread. The ends of the thread are secured to the front of the card above and below the cutout window (the front is doubled layered too to give a neater final appearance with no loose ends being visible). The figure could then be "wound up" before being put in the envelope so that when it was taken out it would spin within the window.


To do this the cutout black silhouette is in two identical layers, between which is sandwiched a thread. The ends of the thread are secured to the front of the card above and below the cutout window (the front is doubled layered too to give a neater final appearance with no loose ends being visible). The figure could then be "wound up" before being put in the envelope so that when it was taken out it would spin within the window.


The design itself I did in illustrator and cut out using my vinyl cutting machine, it takes a few passes to cut through heavy card and usually needs me to finish it off by hand too. I'm trying to think of other designs I could use for the spinning insert now, any suggestions welcome!
Saturday 3 September 2011
Week 7 - Ten of the best creative infographics
I've always been drawn to infographics, a discipline which involves conveying information, data or knowledge in graphical form. Infographics take many forms, from simple road signs and pie charts to timelines, maps and diagrams which show complex relationships and interations between the data being examined. A good infographic makes the most complex information easier to understand, and a great infographic, in my opinion, not only does this but also manages to present it in a visually appealing, creative manner.
In that vein, here, in no particular order, are ten great infographics. They all contain quite a bit of information so it's well worth clicking on them to see the detail.
The Very, Very Many Varieties of Beer
Links between the major styles of beer along with examples of each type and glassware recommendations
Author: Pop Chart Lab

Underskin
Tracing the routes of the systems of the human body
Author: Sam Loman

Periodic Table of Typefaces
Author: Cam Wilde

The Apple Tree
A visual history of Apple products
Author: Mike Vasilev

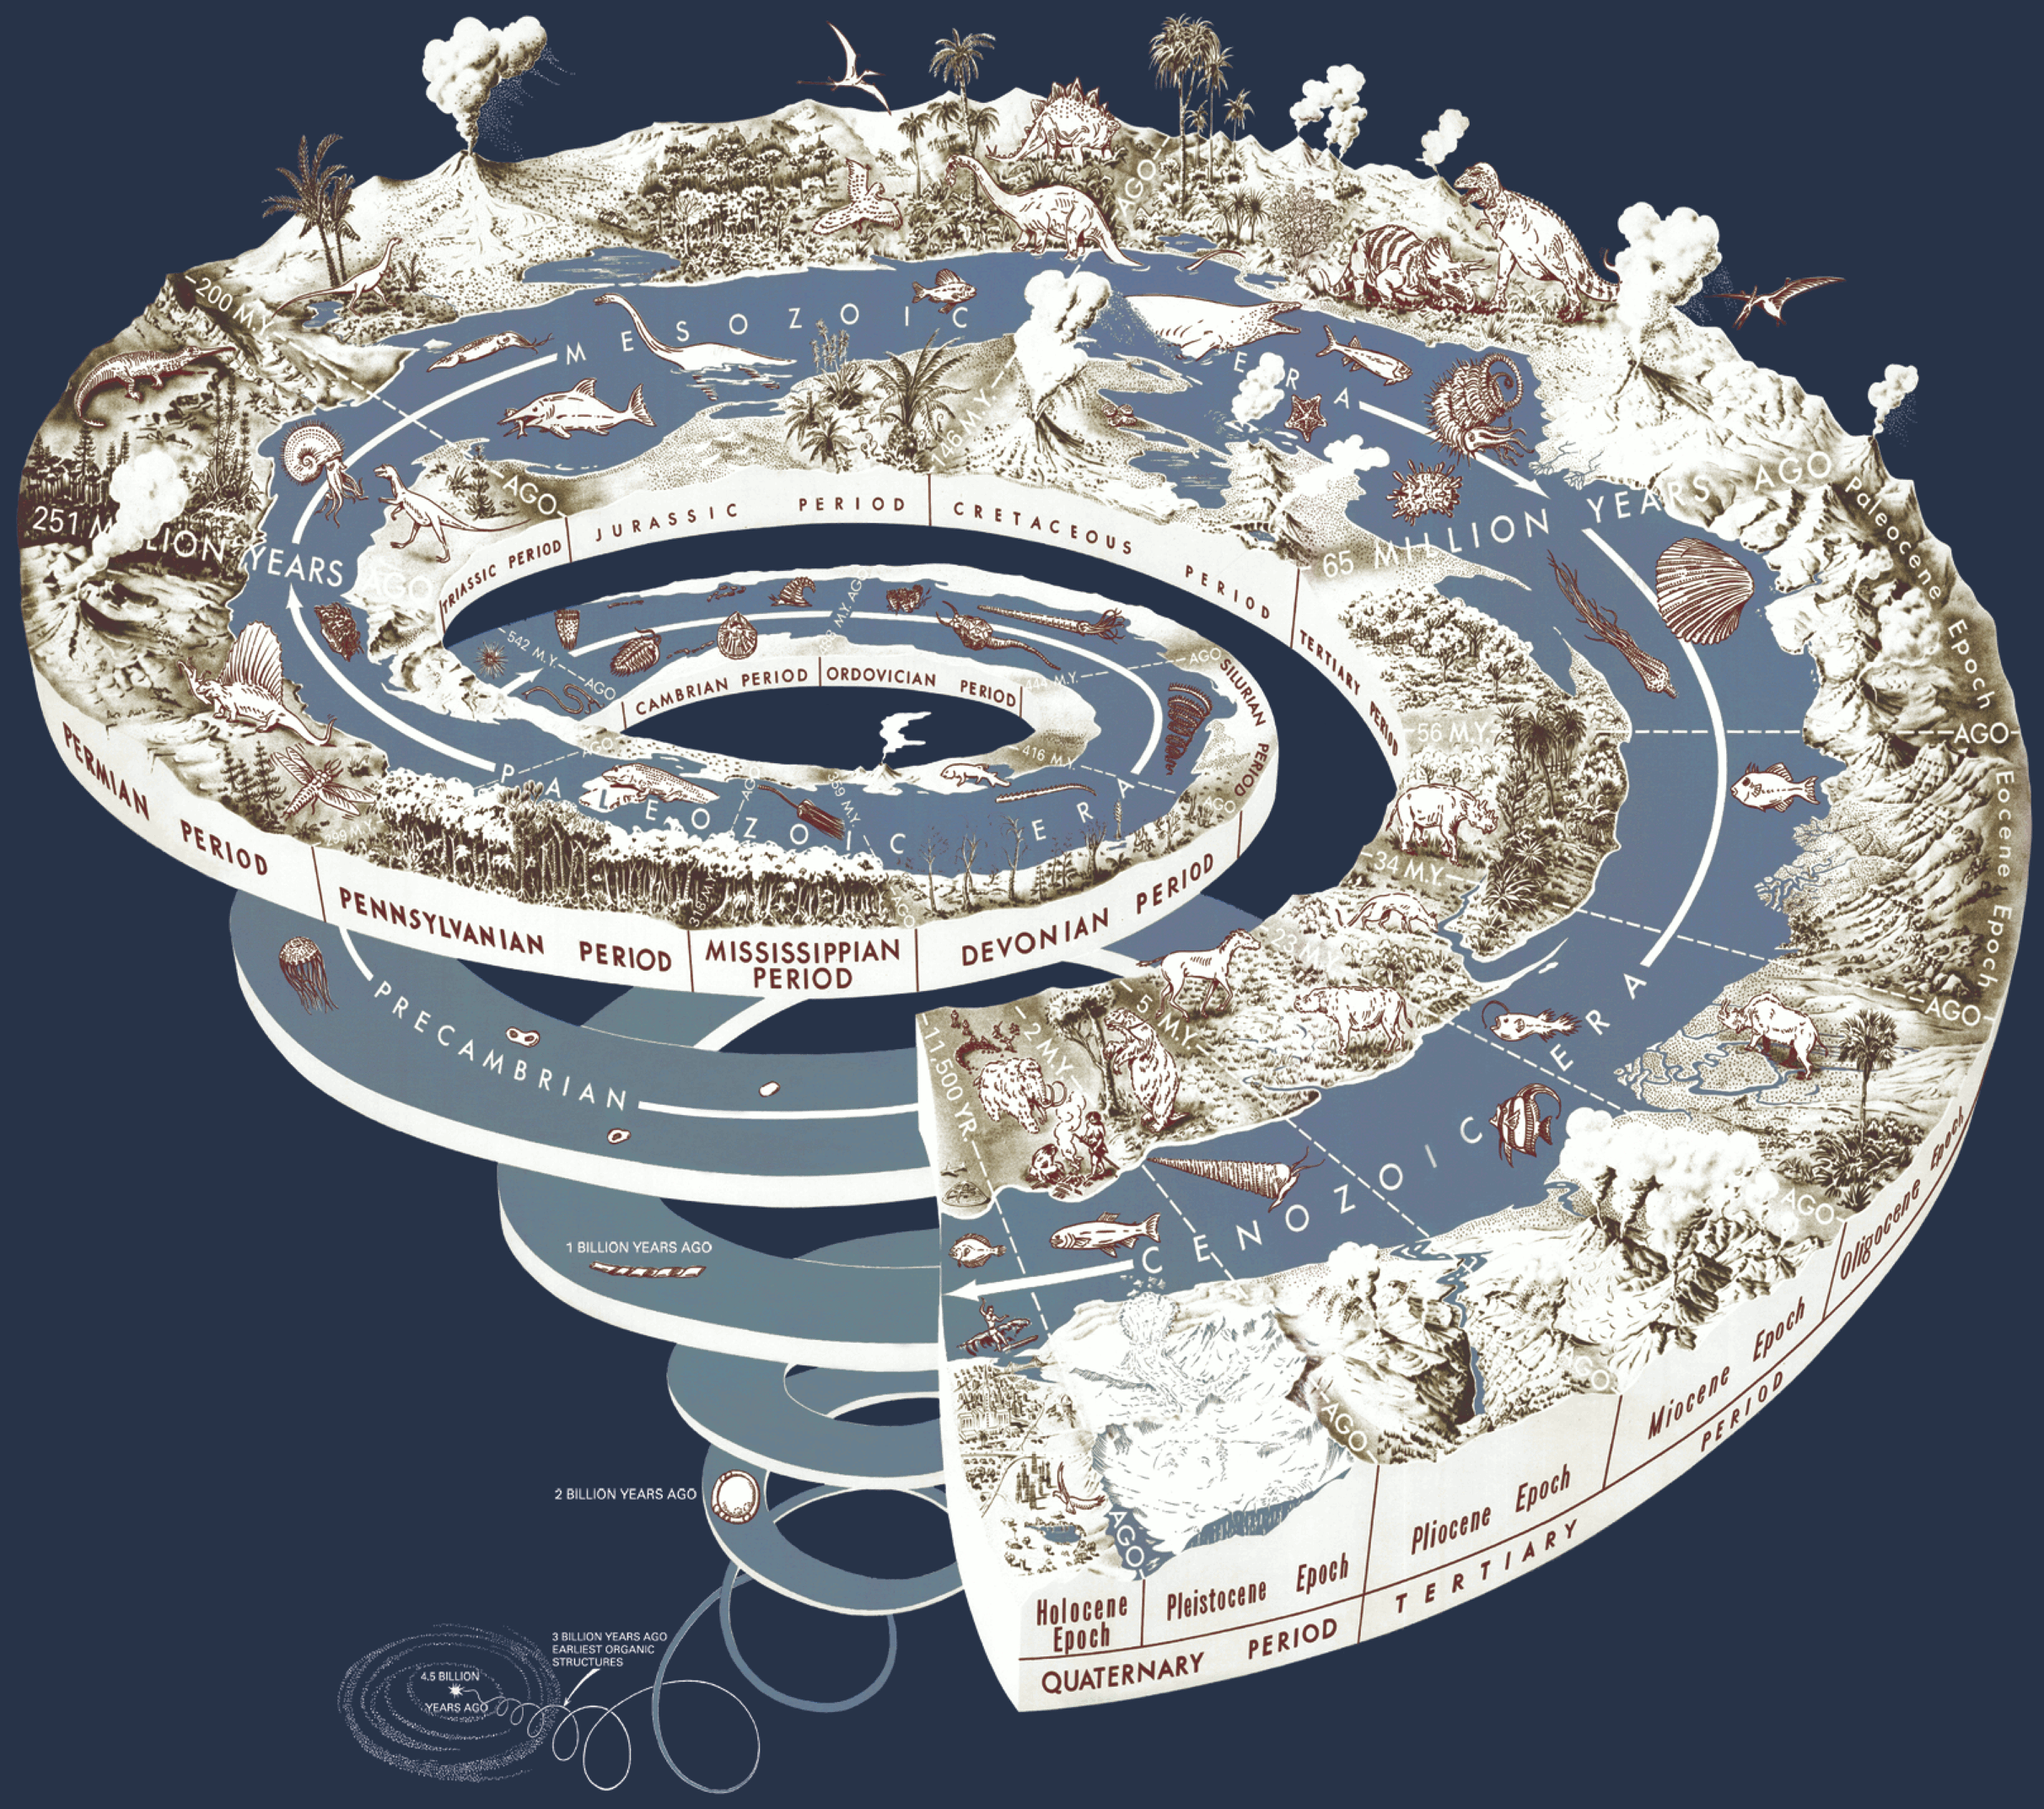
Geological Time Spiral
Showing the time scale of the evolution of life on earth
Author: Joseph Graham, William Newman, and John Stacy
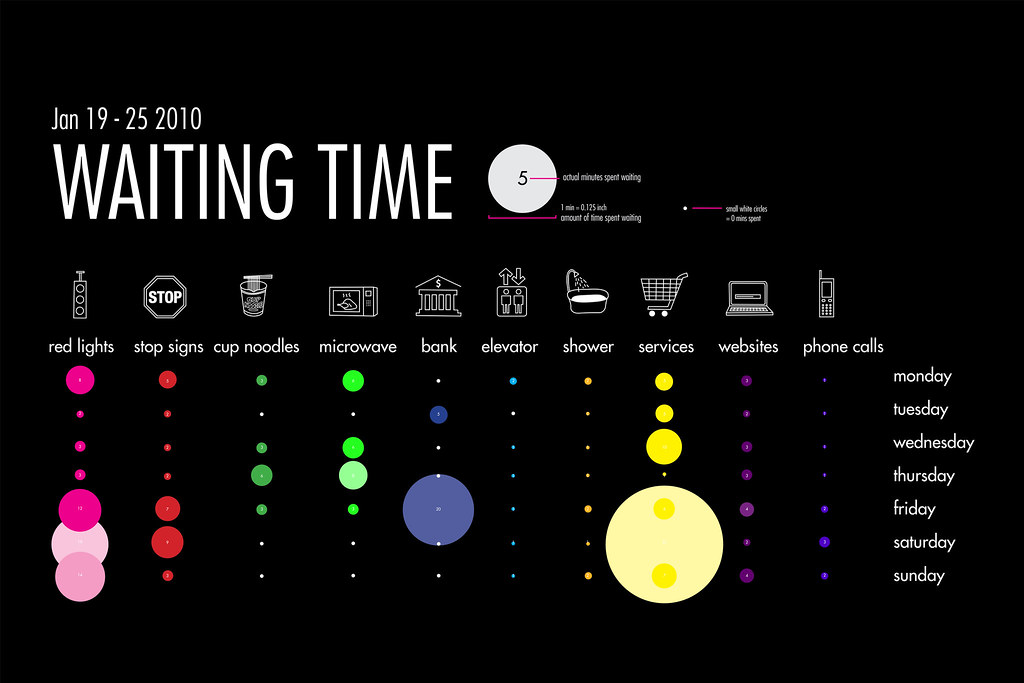
Waiting Time
Infographic detailing time spent waiting in one week
Author: Ruth Tsang
Trustworthiness of Beards
Judging the trustworthiness of a person based strictly on beard style
Author: Matt Macinerney

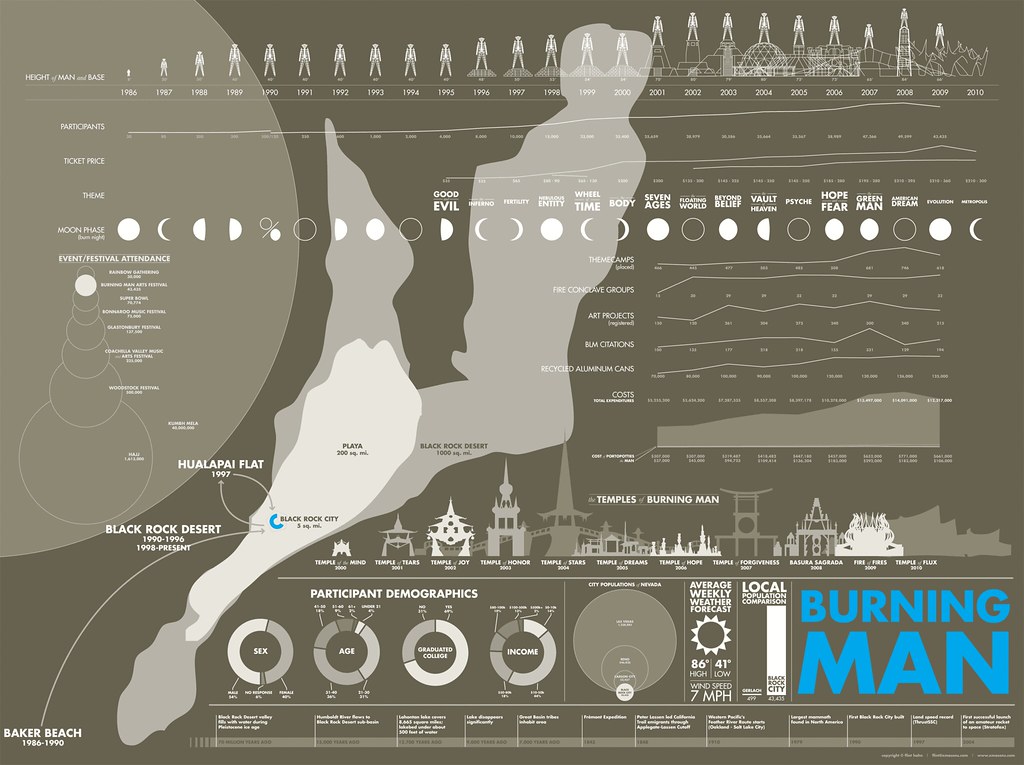
Burning man Festival
The history of the festival, from it's days as a simple gathering on a beach to the present.
Author: Flint Hahn
50 Years of Space Exploration
Traces over 200 space missions
Author: Sean McNaughton, National Geographic & Samuel Velasco, 5W Infographics

Noob Guide to Online Marketing
A very comprehensive 6-month action plan for marketing your business online
Author: Oli Gardner

In that vein, here, in no particular order, are ten great infographics. They all contain quite a bit of information so it's well worth clicking on them to see the detail.
The Very, Very Many Varieties of Beer
Links between the major styles of beer along with examples of each type and glassware recommendations
Author: Pop Chart Lab
Underskin
Tracing the routes of the systems of the human body
Author: Sam Loman
Periodic Table of Typefaces
Author: Cam Wilde
The Apple Tree
A visual history of Apple products
Author: Mike Vasilev
Geological Time Spiral
Showing the time scale of the evolution of life on earth
Author: Joseph Graham, William Newman, and John Stacy
Waiting Time
Infographic detailing time spent waiting in one week
Author: Ruth Tsang
Trustworthiness of Beards
Judging the trustworthiness of a person based strictly on beard style
Author: Matt Macinerney
Burning man Festival
The history of the festival, from it's days as a simple gathering on a beach to the present.
Author: Flint Hahn
50 Years of Space Exploration
Traces over 200 space missions
Author: Sean McNaughton, National Geographic & Samuel Velasco, 5W Infographics
Noob Guide to Online Marketing
A very comprehensive 6-month action plan for marketing your business online
Author: Oli Gardner
Monday 8 August 2011
Week 6 - Personalised gift tags

I didn't want to just do simple paper tags as I wanted something a bit more substantial so I use a special type of plastic that you shrinks when heated to give a nice, solid tag. You can draw or print on the plastic and as the material shrinks so does the applied design, the hard part is working out how large to make the original print so it gives you the right size when it's been shrunk down. I use this same material to make other things like name badges, zipper pulls for hoodies and bags and small charms. It's pretty versatile.
This particular order was for a lady who wanted a couple of sets of cufflinks to give as a gift to her husband and his brother as they were opening up a pizzeria. She wanted the gifts tags to have the new restaurant's logo on. After preparing the logo to make it suitable for the printing & shrinking it is printed out onto the plastic, then cut to size. I always round the corners when using this plastic as if they are left square then once shrunk they can be quite sharp. I also make sure to make any hole I need before shrinking as it's a pretty tough material to cut afterwards.
Once printed and trimmed the next part of the process is the shrinking, I usually do this in the oven but you can also use a heat gun. Watching the plastic shrink can be a bit nerve-wracking as it curls up and jumps around, as long as the pieces aren't to big them they will eventually even out and flatten themselves again. Below you can see the pieces before and after shrinking, note the difference in thickness and how the shrinking process makes the printed colours more vivid:


The print on one of the larger tags ran a little, the smaller tags were better suited in size for this job anyway (I'd made two sizes to have a choice as you can't always predict how much the plastic will shrink).All that's left is packaging up the cufflinks and stringing the tags on the ribbon ready to send out. The completed packages can be seen below:


The great thing with the shrink plastic is you can also cut it to make simple shapes; for example, in the past I've done heart shaped tags for an anniversary present. Anyone who'd like personalised gift tags with an item simply add details in the comment to seller box when placing your order and if I need any further details I'll get in touch.
Wednesday 22 June 2011
Week 5 - Glass engraving
One of the reason's I wasn't able to update this blog as often as I'd have liked over May was that my martial arts club (Kuk Sool Won Glasgow) was hosting the 2011 Scottish Championships so as well as competing there was quite a lot of work for everyone to do to help organise the event. As well as some general design work I also made some personalised glasses for the Masters' top table.


These had the martial art's logo on one side and the Masters' titles and names on the other side. I use a chemical etching process to do this meaning that the designs can be quite detailed and are more precise than I'd be able to do with hand etching. The design is permanently cut into the surface of the glass and not painted or applied onto it so it is permanent and dishwasher proof.


I'm happy with how they turned out and I think they went down well with the masters themselves!
Tuesday 14 June 2011
Week 4 - back on the horse!
Phew - a busy last few weeks (more about that in a future post!) has got in the way of me updating the blog but catching up now and to make it up I've decided to do some double weeks i.e. at least two posts for the next few weeks till I'm back on track!This week I decided to get on top of updating my Folksy shop. This meant working my way through all my stock checking what I have and re-listing items that I had previously sold so they were available again. I've still got a few listings to put back up but currently the shop is now up to 76 items! This also means I now have a list of all the stock I need to photograph to then make up new listings for. this list currently sits at 92 items so busy times ahead again, just hope the sun holds out for a wee while to help me get some clear pictures.
I need to do the same with my Etsy store, my aim is to maintain both at over 100 items as this will increase my visability to people searching the sites. And I also want to get started on listing some of my t-shirt designs on both sites within the next few weeks and work on some new products. Some of the items I've updated listings for are shown below:


The last few weeks too have seen a big increase in the number of custom order requests I've had in, a lot of them for weddings. I love working on custom items, I'll show some of the recent ones in a future post too.
Sunday 24 April 2011
Week 3 - Preparing for the Grassmarket Festival
So as well as making stock I've been trying to get together a few promotional items for the fair including making totebags with my logo on (see below). I'm thinking of offering these free to people who spend over a certain amount of money on my t-shirt/clothing items.


For my jewellery and accesories I'm making up wee cotton pouches, again with my logo on. Although I love the black boxes I usually use for online orders I've found these to be a faff when selling in person as it can be awkward tying the ribbons etc when it's busy. The pouches will be much easier i think, plus I'll still bring some boxes for anyone who'd like a more formal gift-wrapping.


I'm also working on some other promotional items which I'm going to use as free gifts for the fair and for an online promotion later on. I need to get some photos of these made up once they're finished; in the meantime if you happen to be around Edinburgh on Friday pop by my stall, if you mention you read this then I'll give you a wee free gift. So on with preparing stock for my stall, keep your fingers crossed for me that it's a sunny day!
Also check out Nanuk Jewellery's Whoopie Pies she made for her challenge 52...they look so delicious!
Tuesday 12 April 2011
Week 2 - Mousemats
Second week of Challenge 52 and this week the focus is a new product. I have made several items for Anne of Anne Reeves Jewellery personalised with her logo in the past, including an apron for her workshops and a phone cover, so when she contacted me about making her a personalised mousemat I agreed to add these to my product range. I make these items in the same way I do my t-shirts - with contour cut vinyl. Vinyl is an extremely thin sheet of highly coloured material that is heat activated to form a permanent bond with material. The manufacturers say that the bond it forms should outlast the life of the garment/item itself so it is a great alternative to screen printing, especially when one-offs are needed or when special effects like chromes, glitters etc are desired.
The first step in making something is to make sure the design itself can be cut. There are two main type of image files - vector and raster. Raster images are made up of pixels (like most "picture" and photo files) so the shapes and colours are made up of variations in colour of these pixels. As automated cutting machines need a shape or edge to cut these files are no use to them and have to be converted to the second type of file, a vector file, before they're ready for cutting. Vector files contain mathematical information that describes the colours, shapes, lines etc within the image, essentially you can think of them being made up of actual shapes instead of a collection of dots. These my cutting machine understands as it gives it the shapes it's required to cut.
So my first task in making a personalised item for someone is usually vectorising their logo if they can't supply me a vector version (NB if you get your logo made up professionally they should supply you with this version as it's also the best version for print, it will usually be an eps, ai, or vectorised pdf file). Luckily in this case i had aldready done this the first time Anne ordered something from me. You can see her original logo and the vectorised version below.
 |
| Original raster image |
 | ||
| Vectorised image |
Once I have the vector version of the image I can then cut it in the vinyls I've selected to match the colours. In this instance Anne had told me previously she liked the metallic colours I used in her phone cover (I'd made one side with metallic vinyls and the other in a different process with her original logo printed full colour), so I used the same colours in this job - shimmery mettalic purple and shimmery baby pink. Once cut i then "weed" the logo and apply it using my heat press. I'll go further into this process in a future post I have planned where I'll take you through the steps I go through in making a t-shirt.
So the end result is I have a personalised mousemat ready to send out to Anne. I've added some pictures of the finished article below, the camera's not great at picking out the simmer of the colours!


Before Anne asked me about this I hadn't thought about making mousemats as I assumed that most people didn't use them anymore but I've been inspired to add them to my range in my online store. I mocked up some pictures of mousemates with different logos on (including mine!) for the listing. If anyone's interested you can see the listing here.


Another Challenge 52 participant Louise from Nanuk Jewellery has posted up Week 2 as well, you can find her post here.
Subscribe to:
Posts (Atom)